As an Amazon Associate, we earn from qualifying purchases. Some links on this site are affiliate links at no extra cost to you. Our recommendations are based on thorough research and editorial judgment.
Restoring Bent Bristles: Can You Save a Damaged Brush?
Yes, we can often save a damaged brush with bent bristles using some simple techniques. First, soak the brush in warm water for about five minutes to soften the bristles. Then, gently reshape them back to their original position with our fingers. For stubborn bends, mixing vinegar with warm water can help relax the bristles. After reshaping, we need to dry the brush upright. If we’re careful, we can restore our brushes and get them ready for the next project. Keep going to discover more restoration tips!
Key Takeaways
- Soak the brush in warm water for five minutes to soften the bristles before attempting restoration.
- Gently reshape bent bristles back to their original position using your fingers for best results.
- For stubborn bends, mix vinegar with warm water to enhance flexibility while reshaping.
- Allow the restored brush to dry vertically with bristles pointing downward to maintain its shape.
- Assess the overall condition of the brush; if issues persist, restoration may not be effective.
How to Identify When Your Brush Needs Restoration

You may be interested


How can you tell when your brush needs a little care? Start by taking a close look at the bristles. If they feel hard, bent, or frayed, that’s a clear sign it’s time for some TLC. Dried paint at the tips or stuck between the bristles? That typically means it hasn’t been cleaned properly after use, indicating you might need to bring out some deep cleaning techniques.
A stiff variation among bristles can be a cue, too. It might suggest that the brush has been used inconsistently or exposed to harsh materials. Keep an eye out for this! Don’t overlook cracked or damaged tips, either; they often point to too-aggressive cleaning in the past.
Now, if your brushes have been around for five to ten years without much bristle maintenance, take a moment to assess them. Instead of tossing them in the trash, consider restoration—it could save your trusted tools and keep your artistry alive.
Signs of Brush Damage

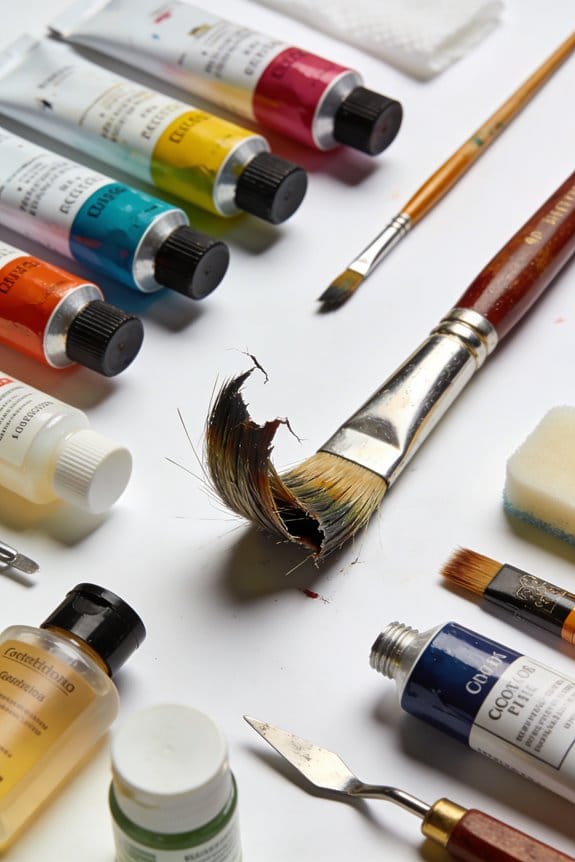
Ever notice how your paintbrushes don’t seem to perform like they used to? It’s easy to overlook the signs of brush damage until it’s too late. Frayed or split bristles are pretty obvious red flags that your brushes aren’t getting the care they need. When the bristles can’t hold or spread paint properly, it’s clear something’s wrong.
Bent bristles are another common issue, often caused by not cleaning or storing them right. Have you ever grappled with painting only to discover your brush just isn’t cooperating? It’s frustrating! Pay attention to changes in bristle stiffness too—this can signal underlying problems.
And let’s not forget about those pesky paint clogs at the tips. Nothing limits your painting flexibility like hardened paint stuck in the bristles. To check the condition of your brushes, try bending the bristles gently. If they spring back, you might still have a chance to save them.
Regular maintenance is key to keeping your brushes in tip-top shape. So, how often do you take a good look at your painting tools? Taking a little time to care for them can go a long way in enhancing your creative process. What’s your go-to trick for keeping your brushes ready to roll? Proper cleaning and reshaping after each use is essential to maintain the brush’s original form and extend its longevity.
Best Cleaning Solutions for Brush Restoration

Have you ever looked at your paintbrushes and wondered what happened to all those once-proud bristles? If they’re bent or encrusted with dried paint, it can feel like too much work to bring them back to life. But there are some solid cleaning solutions that can really help.
First off, solvent-based cleaners like acetone and ammonia are super effective at dissolving stubborn paint. If you soak your brushes in these solvents, you can usually get away with a soak of up to two weeks. That’s right—two weeks—letting those hardened, crusty messes loosen up. Just a heads up, though: you’ll want to scrub gently with a stiff plastic brush since metal can ruin those delicate bristles.
For those of you looking for a safer, more natural option, vinegar can be your best friend, especially if you’re working with natural bristle brushes. It’s a gentler alternative that can still do a great job cleaning without the harsh fumes.
So, why does this matter? Because safety should always come first! When using solvents like acetone, make sure you’re working outdoors and cover your soaking jar with plastic wrap to keep the fumes down and reduce evaporation.
Wrap it all up, those cleaning techniques can restore not just functionality to your brushes but also extend their lifespan. You might even feel a little nostalgia as you bring those old friends back into rotation. Are your brushes ready for a second chance?
Additionally, knowing the cleaning and maintenance techniques for brushes can help ensure they perform well over time and maintain their shape.
Step-by-Step Guide to Soaking a Brush
Got a brush with stubborn paint stuck in it? You’re not alone! Cleaning brushes can feel like a chore, but soaking them is one of the best ways to revive them.
First, check your brush’s condition. Look for hardened paint clumps and bent bristles. If you spot any of those, it’s definitely time to show your brush some love with a soak. Here’s the trick: you can use either acetone or ammonia for the soaking solution. Fill a glass jar with your chosen liquid and submerge the brush. Cover it with plastic wrap to cut down on evaporation—this little step can really help!
Now, it’s time for the wait. Soak that brush for up to two weeks. Yeah, it sounds like a long time, but it gives the dried paint a chance to really break down. To speed things up a bit, give the bristles a gentle scrub with a stiff plastic brush every now and then.
Once the soaking time’s up, don’t skip this crucial step: rinse your brush thoroughly with clean water. It’ll make a world of difference. And when it comes to drying, be sure to let it air out in a well-ventilated area. You want to maintain its shape, so consider storing it upright or at least in a way that doesn’t distort its bristles.
Truth is, a little patience and care can bring your brushes back to life. How do you keep your painting tools in top shape? Remember, quality handling during cleaning is key to prolonging brush life and maintaining performance.
Safely Remove Dried Paint
Have you ever found yourself staring at a pile of dried paint stuck on your brushes? It’s super frustrating, especially when you forgot to clean them after your last project. But don’t worry; there are safe and easy ways to bring those brushes back to life.
To start, many people turn to acetone. It works well, but honestly, you should use it outdoors. The fumes can be harsh, and you don’t want to breathe that in. If you’re looking for a gentler solution, try soaking your brushes in vinegar. It’s effective and helps keep the bristles in good shape.
When you’re ready to soak, pour the vinegar into a jar and cover it with plastic wrap. This keeps the vinegar from evaporating too quickly. After letting them soak, grab a stiff plastic brush to scrub the bristles. Avoid metal brushes, as they can scratch and damage your brushes.
Here’s a tip: the sooner you clean your brushes after using them, the better. Dried paint is a pain to remove and can really ruin the bristles. By following these methods, you can save your brushes from permanent damage and keep them in great condition.
For the best results, always use brushes with durable nylon bristles as they maintain their integrity better throughout repeated cleanings.
Tips for Fixing Bent Bristles
Have you ever finished cleaning your paintbrushes only to find the bristles all bent out of shape? It’s a frustrating moment, but don’t worry; there are easy ways to set things right.
To start off, soak your brush in warm water for about five minutes. This softens the bristles, which makes it way easier to get them back in line. Once it’s had a good soak, take a moment to gently reshape the bristles with your fingers, guiding them back to a straight position. If you still see some stubborn bends, try mixing vinegar with warm water to help relax the bristles even more.
Here’s the trick: After restoring your brush, always dry it vertically with the bristles pointing downward. This simple step really helps keep its new shape intact. And if your brush still isn’t cooperating after all that, it might just be time to think about getting a new one—especially if it’s been by your side for over 5-10 years.
Using a brush cleaning jar with removable filters can also help extend the life of your brushes by keeping cleaning solutions clean and bristles in better shape.
Is It Worth Restoring This Old Brush?
How do you decide if that old paintbrush in the corner deserves a second chance? First, think about the brush’s age and condition. If it’s between 5 and 10 years old and the bristles and handle aren’t totally falling apart, there’s a good chance it’s worth restoring.
Consider what kind of paints you’ve used with the brush. Oil-based paints can be a hassle to clean, but if it’s a high-quality brush, putting in the effort to restore it might be justified.
Next, take a close look at the bristles. If the softer bristles are still in decent shape but the stiffer ones are damaged, don’t lose hope! You can often still get good results.
Do a quick cost-benefit analysis: weigh how much time and effort you’d need for restoration against the price of buying a new brush. Feeling attached to the brush or appreciating its unique characteristics can also play a big role in your decision.
Honestly, it’s about finding that balance—sometimes, that old companion just needs a little love to bring it back to life. So, why not give it a shot?
Remember that proper cleaning and maintenance after restoration is crucial to extend the brush’s lifespan and preserve its performance.
When to Discard Your Brush: Signs Indicating Disposal
When you’re staring at that old paintbrush, it can be tough to decide if it’s time to let it go. There are some pretty clear signs that can help you make that decision easier. If the bristles are bent or frayed and won’t bounce back after cleaning, it’s probably time to toss it. A brush that feels hard and brittle likely needs to be replaced, too.
If you find it’s caked with dried paint that just won’t budge, that’s a red flag. How can you expect to get a smooth finish with a brush that’s compromised? And let’s not forget—missing or damaged bristles lead to uneven painting, which is frustrating.
Here’s a simple checklist to consider:
- Bent or frayed bristles? Toss it.
- Hard, brittle feel? Replace it.
- Caked on paint? It’s time to part ways.
- Missing bristles? Say goodbye!
Taking care of your brushes can extend their lives significantly. But if you’ve used a brush with strong solvents and haven’t cleaned it properly, it may not be worth keeping. Remember, regular cleaning is essential for prolonging brush life and maintaining optimal performance.
Preventing Brush Damage in the Future
You ever finish a painting project only to find your brushes looking worse for wear? It’s frustrating, right? But don’t sweat it. There are some easy, practical steps you can take to keep your brushes in great shape for your next masterpiece.
First off, always clean your brushes right after you use them. If paint dries on those bristles, it can really mess them up for good. Use warm water and a gentle soap for everyday cleaning. If you’ve got tough stains, vinegar works wonders most of the time, though you might need to pull out acetone for those stubborn spots.
Proper brush storage is another biggie. You want to store brushes upright or even hang them if you can. This keeps their natural shape intact. Placing them flat or stacking them? That’s asking for trouble.
Oh, and don’t forget about using brush guards or wraps. They can really help maintain that bristle shape when you’re not using them.
Additionally, choosing brushes with ergonomic handle designs can reduce hand fatigue during use, helping you care better for your tools.
Truth is, if you follow these simple steps, your brushes can stay in top-notch condition, ready for whatever project you throw their way next. So, what do you think? Are you ready to give your brushes a little TLC?
Frequently Asked Questions
How to Fix Bent Brush Bristles?
To fix bent brush bristles, we should soak it in warm, soapy water and gently reshape them. Regular brush maintenance is essential for bending prevention and ensuring our brushes last longer and perform better.
How to Fix Damaged Hair Brush Bristles?
To fix damaged hairbrush bristles, we should prioritize brush maintenance and gentle bristle care. After soaking the bristles, we can reshape them with our fingers, ensuring not to use excessive force to avoid further damage.
How to Straighten Bent Broom Bristles?
Did you know that 70% of broom users neglect proper broom maintenance? To straighten bent broom bristles, we should soak them in warm soapy water, gently comb, or use steam for effective bristle care.
How to Fix a Misshapen Brush?
To fix a misshapen brush, let’s soak the bristles in warm, soapy water, reshape them gently, rinse thoroughly, and dry horizontally. Regular brush care and bristle maintenance can prevent these issues from happening again.


